Wednesday, April 24, 2013

Torcettini di Saint Vincent (Sugar Crusted Twisted Cookies from the Valle d’Aosta)

 This month in We Knead To Bake group Aparna had decided to bake Torcettini di Saint Vincent (Sugar Crusted Twisted Cookies from the Valle d’Aosta).  In the We knead to Bake group, we are all experimenting with baking using yeast, under the expert guidance of Aparna.  Loved making these cute small biscuits this time.  Below is the information about Torcettiini, in Aparna's own words.  It was very interesting to read the origin of these biscuits.


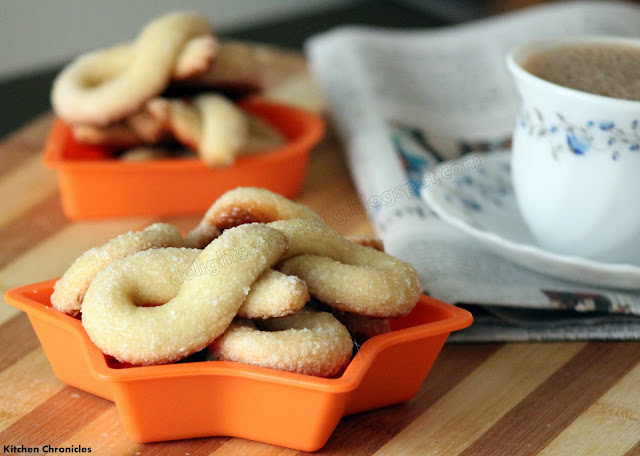
Torcettini are smaller versions of the Italian Torcetti (meaning small twists), and these pear/ teardrop shaped twists are made of a dough of flour, yeast and butter which are shaped and then rolled in sugar before being baked. 

The origin of these biscuits is believed to be from Grissini (breadsticks) which were made from the leftover scraps of bread dough. According to one story, a Grissini baker had some leftover butter which he needed to use up. Inspiration struck and he decided to add the butter to the last batch of his Grissini dough for the day. To be able to differentiate this lot of “breadsticks”, he rolled them in sugar and shaped them into loops, and the Torcetti was born. Torcetti/ Torchettini taste even better when they’re flavoured with lime/ lemon zest or anise.
  
These biscuits are crunchy, not very sweet and pair very well with cold milk, hot chocolate, tea/ coffee or wine. They are delicious served warm and equally good cold, and keep very well if stored in airtight containers. 


Torcettini di Saint Vincent
(Adpated from A Baker’s Tour by Nick Malgieri)

Ingredients:
 1/2 cup warm water, about 110F
 1 1/4 tsp active dry yeast (or 1 tsp instant yeast)
 1 1/2 cups all-purpose flour
 1/4 tsp salt
1 tsp lime/ lemon zest (replace with orange zest for the chocolate version)
 40gm unsalted butter, cold and cut into small pieces
 about 1/3 cup sugar for rolling the cookies


Preparation:

1)   Dissolve the yeast in the warm water, in a small bowl and keep aside.

2)   Put the flour and the salt in the food processor bowl (or a largish regular bowl if kneading by hand) and pulse a couple of times to mix. Add the butter pieces and pulse until the butter is well mixed and the flour-butter mixture looks powdery.

3)   Add the yeast-water mixture and pulse till it all comes together as a ball. Do not over process or knead.

4)   Place the ball of dough in a oiled bowl, turning it so it is well coated with the oil. Cover the bowl, and let the dough rise quite a bit.

5)   This dough does not really double in volume, but it should look “puffy” after about an hour or so. When you pinch off a bit from the top you can see the interior looking a bit like honeycomb. Press down the dough and deflate it, wrap it in cling warp and refrigerate it for at least one hour or up to 24 hours.

6)  When ready to make the cookies, take the dough out and lightly roll it out into an approximately 6” square. If the dough feels sticky, scatter a little sugar on it. 

7)   Cut the dough into four strips of equal width. Cut each strip into 6 equal pieces, by cutting across, making a total of 24 pieces. The measurements are not very critical.

8)  Roll each piece into a pencil thick “rope” about 5” long. Sprinkle a little sugar on your work surface and roll the “rope” in it so the sugar crusts the dough uniformly. Form the “rope” into a loop crossing it over before the ends.

9)  Place the Torcettini on parchment lined baking sheets, leaving 1 1/2" between them. Leave them for about 20 minutes or so till they rise/ puff up slightly. They will not “puff up” much.

10)Bake them at 160C (325F) for about 25 minutes till they’re a nice golden brown. Remove them immediately from the parchment and cool them on a cooling rack.  Store them in an air-tight container at room temperature.


Thursday, February 28, 2013

Know Your Dairy Series : Ghee

Its going to rain Ghee here in Kitchen Chronicles this month. Know why?

Because this month I am hosting "Know Your Dairy Series : Ghee" here at Kitchen Chronicles.  Know Your Dairy Series was started by Jagruti of Jagruti's Cooking Odyssey.  


Rules to be followed :

1. Post any vegetarian /non-vegetarian recipe prepared using Ghee as an important ingredient between 1st March and 31th March 2013.


2. Link to my event page and Jagruti's event announcement page. Logo is appreciated.


3. Multiple recipes are welcomed .Archieved recipes are accepted only with their reposts with event links and logo.

4. Link in your entries to the linky tool given below.

5. Non - bloggers are also welcome and Send your entries to kitchenchronicles1(at)gmail(dot)com with the subject line as "Know Your Dairy Series : Ghee" furnished with the following details:


Name :
Recipe Name :
Recipe :
Picture of your recipe : 


Also friends do not forget to send in your entries to the "Tried and Tasted : Chettinad Cuisine". Here is the link for it http://elvisalakshi.blogspot.com/2013/02/tried-and-tasted-event-chettinad-recipes.html  The event is from Feb’15th to March’15th.

Also I need guest hosts for the future "Tried and Tasted Event".  If you are Interested in guest hosting the event please mail me at kitchenchronicles1(at)gmail(dot)com or leave me a message in the comment section below.  You can here more details about the event.

I will be adding the linky tool soon.


Wednesday, February 27, 2013

Matar Kachori with Dum Aloo

Matar Kachori is maida puri stuffed with Green Peas masala.  And Dum Aloo is a cooked using small baby potatoes which is simmered in a gravy of Curd and Tomato.  Dum Aloo is serves a best combo for all sort of rotis, parathas and puris.


This month Sonali of Sonali's Kitchen from the Northern Team had challenged the Southern Team with Matar Kachori and Dum Aloo. For more about the SNC challenge visit Divya Pramil's space You Too Can Cook - Indian Food.


Matar Kachori

Ingredients

For the Filling
Matar / Green Peas - 4 cups  (I used frozen peas)
Green Chillies - 6 to 7
Ginger - 1" piece (peeled and washed)
Roasted Jeera (Cumin) Powder - 1 t.sp
Salt - as required
Oil / Ghee - 1 tb.sp
Sugar - 1/2 t.sp
Besan (Bengal Gram Flour) - 1 - 11/2 tb.sp


For the dough
Maida / All purpose flour - 3 cups
Salt
Oil - 2 to 3 tb.sp and more for frying the Kachoris.


Method

1)  Clean and drain the Green Peas.

2)  In a mixer grind together the ginger, green peas, green chillies.  Add little water only if required.

3) Heat oil / ghee in a Kadai.  Add the roasted jeera powder.  Do not allow it to burn.  Immediately add the grinded paste.

4)Add the salt and sugar and mix well.

5) Stir till you feel the raw smell of the peas has gone.  Add the besan and mix well.  This will help in binding.

6) Transfer it to plate let it cool.

7) In a bowl, combine the ingredients for the dough.  Knead using warm water.  Knead till you get a soft pliable dough.

8) Make into small balls and keep closed.

9) Make the Green Peas masala also into small balls and keep covered.

10) Heat oil in a Kadai, for frying the puris.

11) Dust the working surface with some flour and place the dough on it and flat it a little with the help of a rolling pin.

12) Stuff with the green peas rounds and close. Now roll into thin puris as much as possible, taking care not to tear the puris.

13) Fry it in the oil.  Cook on both sides till golden colour and drain and remove the Kachoris. Place it on a tissue paper so as to take away the extra oil.

14) Fry all the Kachoris in the same manner.


Dum Aloo Recipe

Use small baby potatoes as far as possible for this recipe.  I couldn't get the small baby potatoes and hence brought small potatoes, peeled them and cut them into half.

Baby potatoes - 1/2 Kg
Cumin Seeds - 1 t.sp
Fennel Seeds - 1 t.sp
Asafoetida / Hing - a pinch
Green peas - 1/2 cup
Turmeric powder - 1/4 t.sp
Tomato - 3 to 4 medium
Cumin Powder - 1/2 t.sp
Coriander Powdr - 1 t.sp
Kashmiri Mirchi Powder / Kashmiri Red Chilli Powder - 1 tb.sp
Sugar - 1/2 t.sp
Garam Masala - 1/2 t.sp (optional)
Curd / Yougurt - 3/4 cup
Ginger - 1" piece
Fresh Cream - 1/4 cup
Clove - 1 to 2
Green Cardamom - 1
Cinnamon Stick - 1" piece
Oil - 4 -5 tb.sp


Method

1) Peel the skin of the potatoes. Prick it with a fork here and there, all around.  Soak the potatoes in salt water for about 2 to 3 hours.  Remove and drain them on an absorbent paper.  Let them dry for about 15 to 20 min. Heat some oil in a non-stick pan and fry the potatoes till golden in colour. Remove and drain.

In a mixer, grind together the tomatoes, ginger, cloves, green cardamom and cinnamon stick. Grind to a very fine paste.

2) In a bowl mix together beaten curd, cumin powder, turmeric powder, red chilli powder, coriander powder, garam masala and sugar.

3) Heat oil in a kadai.  Add the Cumin Seeds and Fennel Seeds.

4) Add the green peas. Saute for a minute.  Add the curd mixture and the potatoes.

5) Cook till the mixture starts just to boil. Simmer and close the kadai.

6) Let it cook till you start seeing some signs of oil on the top. Keep stirring in between.

7) Add cream, mix well. Cover and cook, till it leaves out the oil.

Serve with hot Matar Kachoris.


Tuesday, February 26, 2013

Utterly Butterly Flaky Croissants

Aparna of My Diverse Kitchen had chosen to bake "Croissants" this month for the "We Knead to Bake" group. And so it was Croissants and Macaroons all over blogosphere this month.


My children and I have always enjoyed croissants.  Many a times I have used the readymade sheets available for Croissants and baked it at home.  So it has always been in my trial list.  But because of loss of a perfect recipe and directions I never attempted to do it.  But this month Aparna gave a very detailed instruction and a good recipe.  So it all worked out fine, without any problem.


The process of baking croissants in this recipe is for three days.  We do a little work on it all the three days.  You can find the detailed recipe at Aparna's My Diverse Kitchen.  Please give me sometime to put the detailed recipe here.  The original recipe was from Jeffrey Hammelman's at Fine Cooking.

Sunday, February 17, 2013

Tried and Tasted - Chettinad Kitchen

Dear Friends,

This time I am hosting the "Tried and Tasted" Event in Classic Chettinad Kitchen.  This time the "Tried and Tasted" Event has a new and unique twist.  Since it is the first event I am hosting there I have decided upon topic relevant to my site. This time it is all about cooking Chettinad Food.  There is option of about 3 to 4 sites from where you can choose the recipes and try them.  The event is from the 15th of February to the 15th of March.  I am accepting both Veg and Non-Veg Recipes.

For more details on this months "Tried and Tasted" event please visit Classic Chettinad Kitchen. I request you all to participate and make the event a success like the previous ones.


Monday, February 11, 2013

Badhusha - Soft and Flaky

Badhushas are very famous Indian sweets and is my favourite too. It is a soft, flaky and layered sweet. I love them very much and can't resist them. They are mildly sweet. I make them for every Diwali since last 4 years and nowadays more often.  It is made using maida dough which is fried in ghee and then dipped in sugar syrup and dried.  The perfecion of the Badhusha is obtained when you get a very soft and a very flaky Badhusha.  Believe me it is not at all difficult to make these delicious sweet. The thing is that you have to be very exact in your measurements and the method to the "T". I found the original recipe here in Raks Kitchen. And it is a never let down recipe. Sowmya of Nivedhanams is hosting the Tried & Tasted event this month. And Raks Kitchen is the blog being tried and tasted. So I wanted to take this opportunity to thank Rajee for this wonderful recipe.


Ingredients

For the Badhusha

Maida - 3 cups
Butter - 1/2 cup
Oil - 1/4 cup
Sugar - 1 t.sp
Curd - 3 t.sp
Cooking Soda / Sodium Bi Carbonate - 3  pinches (1/2 t.sp)
Water - 1/2 cup (approx.)
Oil - for deep frying


For the Syrup

Sugar - 1 cup
Water - just to immerse the sugar
Elaichi - 2 pinches (optional)
Saffron - a pinch (Optional)
Lemon Juice - 1 t.sp


Method


 Melt butter in a pan.


Add oil


Add sugar, curd and sodium-bi-carbonate to it.


Use a whisk and mix it well. Make it almost frothy.


Add the flour to it.


Mix well to make it crumbly.


Add water to make it in the form of a dough.  Be careful while adding water, about 1/4th cup of water is enough, add water little by little form it into a smooth dough.


Keep kneading for another 10 minutes to get smooth shiny, soft and pliable dough.  Knead till you get the smooth texture. Do not cut short this process.


Make small lemon sized balls of equal size.  Now take a ball and keep on pinching the edges and folding it inwards. And go on doing this in a round fashion. So that you get the beautifully decorated rims.


Otherwise just flatten the smooth ball a little between your palms and press in the center with your finger, to form a small depression.  But I never do this, I always like doing the decorated rim. Finish all shaping all the balls and keep them covered.


Meanwhile add sugar to a pan and just add water to immerse it.  Stri till the sugar dissolves and starts boiling.  At this point add about a tb.sp of Milk.  This helps in removing the impurities in the sugar.


Then boil the sugar solution to reach one string consistency.  That is if you pour it in little water it should not dissolve and should form a fine thread.  Put off the flame once the right consistency is achieved.  Add saffron if desired and then add the juice from the lemon. Add powdered Elaichi if needed. I mostly don't add elaichi to Badhushas.


Heat oil in a kadai.  Check whether the oil has heated up well. To do this add a pinch of batter into the oil, if it rises immediately, then its ok.  Do not let the oil heat up too much.


Add some 4 to 5 badushas depending upon the size of the kadai, into the oil.  Put off the fire or remove from fire and let them cooked in this pre-heated oil.


After sometime (about 5 minutes) the Badushas will start floating, then again keep the kadai on fire and cook on medium-low flame till the badhushas turn into beautiful golden colour.

Remove them into a strainer and let the excess oil drain off for about a minute. Then put these hot badhushas in the sugar syrup.  If they don't get fully soaked inside the sugar syrup then pour some syrup over the badhushas with the help of a ladle. Let them remain there for about 3 to 4 minutes.  Till then you can prepare the next set of badhushas.

Transfer the badhushas from the syrup to a plate or to an aluminium foil. Place it one by one. And not, one top of the other.  Let it dry for sometime. Once it dries then it becomes non-sticky.  Transfer it to a clean container. I personally like to eat it after some hours, or better the next day. So that the badhushas soak the syrup inside them and then they taste sweet from inside too.


Sending these delicious, soft and flaky Badhushas to Sowmya of Nivedhanams who is hosting Tried and Tasted this month.  

Dear Friends, I am also looking for future hosts for Tried and Tasted Event. Interested Bloggers please contact me at venkateshlakshmi7(at)gmail(dot)com. For further details about the event and host list on Tried and Tasted, see here.


Manasi of A Cook @ Heart is holding a event called "I Must Make That" and she also has a giveaway. And after seeing her announcement I realized that the CupoNationIndia is catching up faster. And so sending this entry to her.

Sending this to Sumee's culinary Bites where she is hosting Bon Vivant - Quixotic Fixes.


Tuesday, February 5, 2013

Kaju Katli

Kaju Katli, is basically a North Indian sweet, but now popular throughout India. There is no sweet shop in India which does not keep Kaju Katli.  Kaju Katli is like a sort of burfi made using Kajus i.e. Cashewnuts.  My children luv them a lot whenever I used to buy it for some guests I used to get one for them also a small box, otherwise they will not allow me to gift it.  But again Kaju Katli is one of the most expensive sweets in the shop, so I wanted to find out a way to make it at home so that it is not so expensive and at the same time more good than the store bought ones. 


So then I found out a recipe at last which gives the same texture and taste like the store bought ones. My children loved them, I never got a chance to photograph it, though I have been making them for years now.  This recipe I got from Raks Kitchen.  So I thought of posting it now, since this month its Raks Kitchen who is being "Tried and Tasted". It is a sure shot recipe and a never let down recipe. So go ahead and try it.

Making Kaju Katli is very simple, infact the simplest of most of the sweets. And gets ready in very less time and does not involve laborious work.  So ahead and make these Kaju Katlis in your kitchen itself, rather than buying it from the shop. The total cooking time is just about 10 to 15 minutes, depending upon the quantity of the Cashews. The ingredients are very very minimal just Cashews and Sugar, thats it nothing else.


Ingredients

Kaju (Cashews) powered - 3 cups
Sugar - 1 & 1/2 cup
Ghee - for greasing your hands


Method

Powder the Cashews in a dry mixer.  Grind it to a smooth powder at a stretch and not at intervals. Do not keep it coarse.  If during the process of fine grinding, the cashew powder sticks to the wall of the mixer it is ok.

In a non-stick pan put in the sugar and add just enough water, so that the sugar gets immersed in it. Boil it.  The sugar gets dissolved and then starts forming a thick syrup.  Keep a small bowl of water nearby to check for the consistency of the sugar syrup.


The sugar syrup should be 1 string consistency or when you pour a little sugar syrup in the bowl of water it should stay in the water and should not get dissolved.


At this stage add the cashew powder and keep stirring. Slowly the mixture starts boiling and thickening.  Switch of the flame. To test whether it is ready for the Katlis, wet your fingers with water, pinch a small piece of the dough and try to roll it between yours fingers. If you are able to roll a ball without getting your fingers sticky, then it is done. If you feel its not done then put on the stove again and start stirring.


When it is done, put off the stove and still keep stirring in the same pan itself, till the mixture forms like a dough.  Then when it is still warm transfer it to a working board and clean working platform and start kneading the dough.


At this stage the dough will have a grainy texture. Smear your hands with ghee and keep on kneading till you get a smooth dough.


Roll the dough into a thin layer and cut it diagonally.  First just draw the lines ligthly on the dough with the knife and then cut it. This helps you in getting even size pieces.


I used about 3 cups of the powder and it gave me about 40 to 45 whole pieces.  So I said making Kaju Katlis at home is very easy and light on our pockets too.


Note :
Try to choose good quality Cashews. It creates a lot of difference in the taste and texture.

Never use the cashews directly from the fridge or freezer. Bring it to room temperature and then grind it.

The consistency of the sugar is very important, if it doesn't reach the right consistency then the dough will remain sticky.

If the consistency of the sugar has more farther than the one string consistency then add some water let it reach again the required consistency.

After transferring to the counter keep on kneading and kneading till you reach smooth textured dough.


Sending this Kaju Katlis to Sowmya of Nivedhanams who is hosting Tried and Tasted this month.  Dear Friends, I am also looking for future hosts for Tried and Tasted Event. Interested Bloggers please contact me at venkateshlakshmi7(at)gmail(dot)com. For further details about the event and host list on Tried and Tasted, see here.


Manasi of A Cook @ Heart is holding a event called "I Must Make That" and she also has a giveaway. And after seeing her announcement I realized that the CupoNationIndia is catching up faster. And so sending this entry to her.

Sending this to Sumee's culinary Bites where she is hosting Bon Vivant - Quixotic Fixes.


Sheermal

Sheermal or Shirmal is a saffron-flavored slightly sweet traditional leavened flatbread that is found in various countries on the Asian sub...